When Liz reached out about her son Kenny's bedroom, I was so excited! There's something so fun about creating a kids room. I think it's knowing how much imagining and creating will take place in the space.
Kenny is two and a half, and with a baby on the way, his parents needed to give him his own space. His room was on the smaller side, so storage had to be maximized and he also had to have room to play.
Kenny's new space plan is below, and you can find his Urban Perch designed Pinterest board here.
The solution was to create two areas. One for sleeping, and one for playing. The play area would have creative storage solutions and I also wanted to hide the play area from the main entry so that if it was a little messy, it wasn't the first thing you saw.
A few project details:
Avoid: Anything too cheesy
Likes: Gray, White and Navy
Style: Traditional Modern
Space Issues: Lack of space, need storage
Existing furniture: None, but the client liked Restoration Hardware's Haven Bed and Dresser
Kenny is a baseball fan, and Liz (his Mom) wanted that to tie into the theme without being too cheesy. She wanted his room to look like it was out of a catalog (lucky boy!).
The furniture pieces by Restoration Hardware are gorgeous, but I wanted to tie in baseball elements without being over the top. I also wanted to mix and match textures and colors and make it visually appealing. I'm thinking this is a room he can grow into.
I'm really loving this room, but some of my favorite pieces have to be the hopscotch rug by CB2 and the baseball pillow available on Etsy. Also a fan of the large vintage baseball poster to be used on the far wall a graphic art piece. Baseball without cheese.
What are your favorite pieces? Interested in becoming an e-design client? Contact us for more information.
Thursday, July 25, 2013
Monday, July 22, 2013
DIY | Pond Turns Patio
I'm not even sure where to start with the story of our pond renovation. It was a long one, and full of trial and error. And more error at that. I'll try to make it short and sweet, and helpful.
The pond was about 7'0"H x 4'0"W x 3'0"H and filled with mucky water when we moved in. We had no idea where to start, but we knew we had to get rid of it (mosquitoes and raccoon paw prints were just two indicators it had to go).
I did a lot of reading to get started. Actually a lot of Googling. I learned that there are really two camps on the subject of ponds: those that love them and those that hate them.
By the title of this post, I'm assuming you can guess which camp I'm in. I mean, a pond is nice and all. But not if I'm the one maintaining it.
Lowe's has been our second home lately and they're always happy to answer questions. We knew we had to drain the thing, but had no idea how to. I for one wasn't reaching in with a bucket and we couldn't siphon it out because there was no slope.
Lowe's solution: rent a garbage pump (there was a lot of crap in the pond that this would address) from United Rentals.
I rented the pump and attempted to drain the thing while my husband was at work. Bad idea. Really bad idea. Lesson learned: draining a pond is a two person job!
Garbage pump went in and the hose shifted to the neighbors front yard. I was scrambling back and forth, making sure I didn't flood them out, and also making sure I didn't let the pump get above the water (this can burn it out and I didn't want to buy a non-working garbage pump).
Cut to a week later. I knew I had to get some holes in this thing (it was concrete) in order to start draining any additional water. I didn't want to have to rent the pump again. So back to United Rentals I went. This time to rent a hammer drill.
Seemed simple enough. "The concrete doesn't have rebar in it, does it?" asked the guy at United. "No, I don't think so." I responded.
After about ten minutes of attempting to hammer drill into the concrete, I realized that some places did have rebar. Damnit.
Back to the drawing board. Again.
My husband had been sledge hammering the sides of the pond up to this point, but we decided we needed to bring out the big guns. The bottom of the pond had to have holes in it to properly drain. Enter the jack hammer.
So, jack hammers in the cartoons are a lot different than they are in real life. Just an FYI for those (like me) that think they turn on and crumble the earth below them. They actually just dig deep, narrow holes, and don't really break anything up around them. Mind blown. And not in a good way.
So finally, after jack hammering and more sledge hammering, we had the bottom broken up enough to where we felt comfortable filling it in. Small pieces of the concrete were first.
I then found a girl on Craigslist who was willing to drop off fill dirt (she was digging out a patio). She was nice enough to help me shovel it out on our driveway. And then it started raining. Hard. I quickly covered it with a tarp to prevent a mud river.
This was a long process. Much like any of my projects, had I known how long it would take, I probably would have loved having a pond. Mosquitoes and all.
Back to Lowe's we went. With about six inches left to fill, we bought landscaping fabric, paving gravel, paving sand, and large slate stones. We also stopped by the tool library (yes, there is such a thing in Portland) and grabbed a tamper.
We tampered the fill soil. Then we cut the landscaping fabric to the shape of the pond, covered it with a layer of the paving gravel, raked it level-ish and tampered it, covered with a layer of sand, raked it level-ish and tampered it, layed the stones, spread more sand, and swept everything into a place.
After a few days, we found the sand didn't look as good (mainly because our dog was digging in it).
So we removed all of the slate stones, raked the sand even, bought pebble stones, raked them level-ish, put the slate stones back in place (these suckers are heavy), and spread more gravel on top.
.jpeg)
It's been a day and looks great (please ignore the fact that the table needs to be refinished and the space styled and the house painted and my hair washed). I'll let you know how it looks in a week. Oh, and we did remove quite a few plants from the side of the garage.
Moral of the story? Don't buy a house with a pond unless you want to keep the pond.
The pond was about 7'0"H x 4'0"W x 3'0"H and filled with mucky water when we moved in. We had no idea where to start, but we knew we had to get rid of it (mosquitoes and raccoon paw prints were just two indicators it had to go).
![]() |
| This was the pond. The pictures doesn't do it justice. It was bad. |
I did a lot of reading to get started. Actually a lot of Googling. I learned that there are really two camps on the subject of ponds: those that love them and those that hate them.
By the title of this post, I'm assuming you can guess which camp I'm in. I mean, a pond is nice and all. But not if I'm the one maintaining it.
Lowe's has been our second home lately and they're always happy to answer questions. We knew we had to drain the thing, but had no idea how to. I for one wasn't reaching in with a bucket and we couldn't siphon it out because there was no slope.
Lowe's solution: rent a garbage pump (there was a lot of crap in the pond that this would address) from United Rentals.
I rented the pump and attempted to drain the thing while my husband was at work. Bad idea. Really bad idea. Lesson learned: draining a pond is a two person job!
| Garbage pump inserted into the pond. |
![]() |
| In the midst of drainage. I was scrambling! |
Garbage pump went in and the hose shifted to the neighbors front yard. I was scrambling back and forth, making sure I didn't flood them out, and also making sure I didn't let the pump get above the water (this can burn it out and I didn't want to buy a non-working garbage pump).
Eventually the pond was empty. And then it rained. And rained some more. I guess it wasn't summer in Portland yet.
Cut to a week later. I knew I had to get some holes in this thing (it was concrete) in order to start draining any additional water. I didn't want to have to rent the pump again. So back to United Rentals I went. This time to rent a hammer drill.
Seemed simple enough. "The concrete doesn't have rebar in it, does it?" asked the guy at United. "No, I don't think so." I responded.
![]() |
| You can see the hammer drill attempts on the left hand side. It wouldn't even start to break through the bottom. |
After about ten minutes of attempting to hammer drill into the concrete, I realized that some places did have rebar. Damnit.
Back to the drawing board. Again.
My husband had been sledge hammering the sides of the pond up to this point, but we decided we needed to bring out the big guns. The bottom of the pond had to have holes in it to properly drain. Enter the jack hammer.
So, jack hammers in the cartoons are a lot different than they are in real life. Just an FYI for those (like me) that think they turn on and crumble the earth below them. They actually just dig deep, narrow holes, and don't really break anything up around them. Mind blown. And not in a good way.
So finally, after jack hammering and more sledge hammering, we had the bottom broken up enough to where we felt comfortable filling it in. Small pieces of the concrete were first.
I then found a girl on Craigslist who was willing to drop off fill dirt (she was digging out a patio). She was nice enough to help me shovel it out on our driveway. And then it started raining. Hard. I quickly covered it with a tarp to prevent a mud river.
Over the course of a couple days we began to shovel the pile into a wheelbarrow and transport it into the hole that was our pond.
This was a long process. Much like any of my projects, had I known how long it would take, I probably would have loved having a pond. Mosquitoes and all.
Back to Lowe's we went. With about six inches left to fill, we bought landscaping fabric, paving gravel, paving sand, and large slate stones. We also stopped by the tool library (yes, there is such a thing in Portland) and grabbed a tamper.
![]() |
| Landscape fabric |
![]() |
| Paver gravel, Tamper, Paver sand, Repeat |
![]() | |||
| HEAVY |
![]() |
| Before the trimming the fabric and last layer of sand. |
We tampered the fill soil. Then we cut the landscaping fabric to the shape of the pond, covered it with a layer of the paving gravel, raked it level-ish and tampered it, covered with a layer of sand, raked it level-ish and tampered it, layed the stones, spread more sand, and swept everything into a place.
After a few days, we found the sand didn't look as good (mainly because our dog was digging in it).
So we removed all of the slate stones, raked the sand even, bought pebble stones, raked them level-ish, put the slate stones back in place (these suckers are heavy), and spread more gravel on top.
.jpeg)
It's been a day and looks great (please ignore the fact that the table needs to be refinished and the space styled and the house painted and my hair washed). I'll let you know how it looks in a week. Oh, and we did remove quite a few plants from the side of the garage.
Moral of the story? Don't buy a house with a pond unless you want to keep the pond.
Saturday, July 20, 2013
eDesign | Michelle's Master Bedroom
The first e-design project is complete!
Check out Michelle's Master Bedroom. Her new space plan is below, and you can find her Urban Perch designed Pinterest board here (love that she's already started adding to it!).
A few project details:
Avoid: Mustard, Lime, Peach, Pink
Likes: Warm Tones
Style: Modern/Contemporary
Space Issues: Open Concept Bathroom
Existing furniture: Dressers and Bed
I would describe Michelle's style as comfortable contemporary. Think cozy furnishings, warm colors, and clean lines.
I used charcoal blue accents to add texture and color, and to tie in the attached bath. Love, love, love the sliding door to create some bathroom privacy. Also obsessed with the Urban Outfitters side tables (they sell more than t-shirts?) and the Personalized Family Pillow from Uncommon Goods!
The Jonathan Adler tic-tac-toe is just calling for a DIY alternative.
What are your favorite pieces? Interested in becoming an e-design client? Contact us for more information.
Check out Michelle's Master Bedroom. Her new space plan is below, and you can find her Urban Perch designed Pinterest board here (love that she's already started adding to it!).
A few project details:
Avoid: Mustard, Lime, Peach, Pink
Likes: Warm Tones
Style: Modern/Contemporary
Space Issues: Open Concept Bathroom
Existing furniture: Dressers and Bed
| Michelle's Existing Space |
I would describe Michelle's style as comfortable contemporary. Think cozy furnishings, warm colors, and clean lines.
I used charcoal blue accents to add texture and color, and to tie in the attached bath. Love, love, love the sliding door to create some bathroom privacy. Also obsessed with the Urban Outfitters side tables (they sell more than t-shirts?) and the Personalized Family Pillow from Uncommon Goods!
The Jonathan Adler tic-tac-toe is just calling for a DIY alternative.
What are your favorite pieces? Interested in becoming an e-design client? Contact us for more information.
Thursday, July 18, 2013
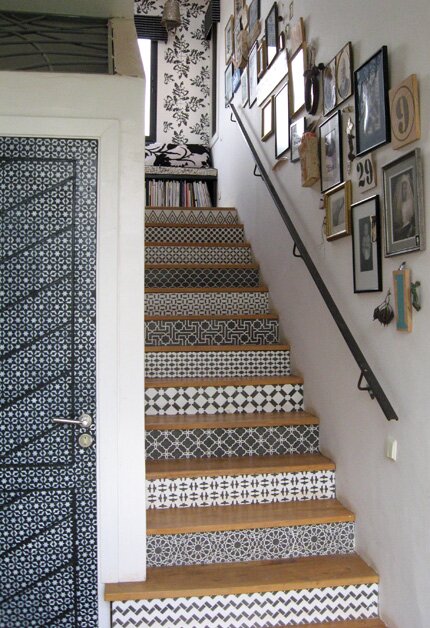
Concept | Seeing Stairs!
We just carpeted our basement. Which, 1. Makes it a million times less creepy, and 2. Makes me want to paint all of it.
Especially our stairs!
So I started looking around for some inspiration. And voila! Here's what I found!
Stay tuned for our stair before and after.
Which one is your favorite?
Especially our stairs!
So I started looking around for some inspiration. And voila! Here's what I found!
Stay tuned for our stair before and after.
Which one is your favorite?
| Wallpapered Stairs by Door Sixteen |
| Stenciled Stairs by Design Amour |
| Ikea Stair Runner by Little Green Notebook |
![]() |
| Madewell Painted Stairs courtesy of Justina Blakeney |
| Inoui Design Office Yardstick Stairs courtesy of Poppy Talk |
Wednesday, July 17, 2013
Shopping | HGTV Design Star
Are you watching HGTV Star? I am. Every Sunday. Religiously.
Some of the designs have been "meh." Many of them actually.
However, I did love Tiffany's design on the last challenge. I mean, there were a few things that were missing, but eclectic furniture and teal gets me every time. And lets be real. Her canvas was a school bus interior.
And by the way, I kind of want to be friends with Sabrina Soto.
A lot of the shopping scenes fly by, but this time I took careful note of where they went.
See below for the list, and next time you're in LA, go crazy!
Some of the designs have been "meh." Many of them actually.
However, I did love Tiffany's design on the last challenge. I mean, there were a few things that were missing, but eclectic furniture and teal gets me every time. And lets be real. Her canvas was a school bus interior.
| Photo Source: HGTV Star |
And by the way, I kind of want to be friends with Sabrina Soto.
A lot of the shopping scenes fly by, but this time I took careful note of where they went.
See below for the list, and next time you're in LA, go crazy!
- Tini
- Blu Dot
- Z Gallerie
- Lumber Liquidators
- Deco Home
- Flor
- Rolling Greens
- Urban Home
- Hye Lighting Co
- Ron Swing
- Anna's Linens
- Landon Cole
Monday, July 15, 2013
Travel | Portland Hotels
Looking for a place to stay in Portland? I was just recently asked and thought I'd share my list of favorite hotels. On and off the beaten track. Perfect for the modern nomad.
Photo Source: Jupiter Hotel
Inn at Northrup Station
TripAdvisor has ranked this hotel #3 on the Portland hotel list. Great location, good value and the reviews are in praise.
Kimpton Monaco
TripAdvisor has this hotel ranked as #1, so it has to be included, right? Fun, eclectic feel and the rooms were just recently renovated. Good touristy location.
Heathman
How many couples have reenacted 50 Shades here? Might want to bring your Lysol. Kidding of course...one of the more expensive hotels on the list, but good location. Wear your fancy pants.
Nines
The public areas at the Nines are some of my favorite. Central location, fun vibe, make sure to check out Departure Lounge on a clear day.
Off the beaten track (in a good, Portland sort of way)
McMenamins Kennedy School
In Northeast (my hood), housed in an old elementary school. Fun property, near Alberta Arts District. Great food spots nearby that are less touristy (Beast, Cocotte, etc.). They also have an old theater in the hotel with couches where you can order beer and pizza. Movies are cheap ($3 - whaaa?).
Jupiter Hotel
Motor Inn turned hip boutique hotel. Southeast has great restaurants. Kind of a "party" scene, but who doesn't like to "party".
Where do you like to stay in Portland?
Photo Source: Jupiter Hotel
Inn at Northrup Station
TripAdvisor has ranked this hotel #3 on the Portland hotel list. Great location, good value and the reviews are in praise.
Kimpton Monaco
TripAdvisor has this hotel ranked as #1, so it has to be included, right? Fun, eclectic feel and the rooms were just recently renovated. Good touristy location.
Heathman
How many couples have reenacted 50 Shades here? Might want to bring your Lysol. Kidding of course...one of the more expensive hotels on the list, but good location. Wear your fancy pants.
Nines
The public areas at the Nines are some of my favorite. Central location, fun vibe, make sure to check out Departure Lounge on a clear day.
Off the beaten track (in a good, Portland sort of way)
McMenamins Kennedy School
In Northeast (my hood), housed in an old elementary school. Fun property, near Alberta Arts District. Great food spots nearby that are less touristy (Beast, Cocotte, etc.). They also have an old theater in the hotel with couches where you can order beer and pizza. Movies are cheap ($3 - whaaa?).
Jupiter Hotel
Motor Inn turned hip boutique hotel. Southeast has great restaurants. Kind of a "party" scene, but who doesn't like to "party".
Where do you like to stay in Portland?
Friday, July 12, 2013
DIY | Solar Tiki Torches
There were a few surprises when we moved into our new home. Some good, some bad.
The padlock on the outside of the master bedroom? I'll go with bad. And creepy (our house is not haunted, our house is not haunted, our house is not haunted).
The outdoor chimney? All good.
The tiki torches? At first glance, bad. But when the junk haulers came, I clang. They had potential. I'm not a hoarder. I promise.
Tikis can seem a bit thematic and when they aren't in use, the lack of function drives me a little crazy.
So my solution? Turn the everyday tiki into a solar lamp and add some low maintenance succulents. Part vertical planter, part solar light. And the best part is that I can easily remove the solar lights and add back the tiki fuel for our next backyard BBQ.
(Want to skip the DIY and buy direct? Check out these solar Tikis from Amazon.)
I wanted a more rustic feel, but you can modify color and twine to fit your taste.
Total Time: 2 hours
Materials:
1. Old tiki torches (or use new torches and avoid the spray paint)
2. 2 cans of spray paint of your choosing (this allowed for two+ coats on five torches)
3. Drop cloth
4. Twine (want color? switch to yarn or washi tape!)
5. Solar lights
6. Plants (I grabbed extra succulents from my front yard)
7. Plant basket liner and some soil

Instructions:
Remove oil canisters
Spray paint both sides of tiki torches. I used about two cans for five torches.
Knot twine and begin to twist around torch's pole.
When you have the coverage you want, tie the end of the twine to the beginning knot. Trim as necessary. Repeat as needed. I added more twine to the top portion.
Cut a small piece of the basket liner and shape into a cup.
Push the liner down into the base of the tiki. It doesn't need to stay in an exact cup as long as it will hold some dirt for the succulent. Put the succulent root through the bottom part, on top of the liner material. Add dirt and push the light down.
More succulents to be added this weekend, but you get the idea.
Voila! Please excuse our yard. It's under construction.
Subscribe to:
Posts (Atom)


.jpeg)
.jpeg)
.jpeg)