Showing posts with label DIY. Show all posts
Showing posts with label DIY. Show all posts
Thursday, September 12, 2013
DIY | Why so quiet?
Things have been quiet around here.
It's eerie.
What's up? Let me tell you.
Well it all started with a visit from a sub contractor that I was thinking about hiring for help with our kitchen refresh. He knew a lot about period details. Particularly, about things in our kitchen.
Then he mentioned that there might be hardwood under our vinyl tiles.
When he left, my interest was piqued. And my husband was out of town. It wouldn't hurt anyone to peel back a piece and see for myself.
Perfect storm.
I was SO EXCITED when I saw the hardwood. I couldn't stop peeling. It was like I had struck gold. I could get this done before my husband came home. A present!
Until, I realized that the adhesive that covered the floor was like one giant, sticky mouse trap. And I was the mouse.
Cue the internet research. Hair driers, peanut butter, detergent, scraping. There was no easy way out. The only thing that worked was goof gone, pine sol and a lot of scrubbing. So much scrubbing that my fingers are now arthritic. And I'm covered in sticky goo. It's not a good look.
So, that's why it's been so quiet. Because I'm past the point of no return. Scrubbing away. Covered in grime. Dreaming of hardwood floors. The dark stuff in the photo is adhesive.
One flooring store we called said it would take three guys a few days to clean the floors. She also said it would be cheaper to lay a new floor than to hire guys to clean it.
Challenge accepted.
Help. Me.
What are you up to?
Sunday, September 8, 2013
DIY | Ikea Hacks
Ikea hacking. Sounds scary, right?
So what's the deal?
Buy inexpensive Ikea furniture, add non-Ikea elements and create new pieces.
Here are a few favorites!
Anthropologie inspired end tables by Cucumbersome
Ikea Rast Side Table goes modern courtesy of Little House Blog
Ikea Bathroom Counter Hack using a kitchen island
Wood shutters using Ikea bed slats
Expedit bookcase turns bench from I Heart Organizing
Elia Maurizi and Francesco Pepa used Ekby series and some paint to create this colorful shelf
Seen any good Ikea hacks lately? Share your favorite!
So what's the deal?
Buy inexpensive Ikea furniture, add non-Ikea elements and create new pieces.
Here are a few favorites!
 |
| Photo Source: Cucumbersome |
Anthropologie inspired end tables by Cucumbersome
 |
| Photo Source: Little House Blog |
Ikea Rast Side Table goes modern courtesy of Little House Blog
 |
| Photo Source: Apartment Therapy |
Ikea Bathroom Counter Hack using a kitchen island
 |
| Photo Source: Vintage News Junkie |
Wood shutters using Ikea bed slats
 |
| Photo Source: I Heart Organizing |
Expedit bookcase turns bench from I Heart Organizing
 |
| Photo Source: Apartment Therapy |
Elia Maurizi and Francesco Pepa used Ekby series and some paint to create this colorful shelf
Seen any good Ikea hacks lately? Share your favorite!
Friday, September 6, 2013
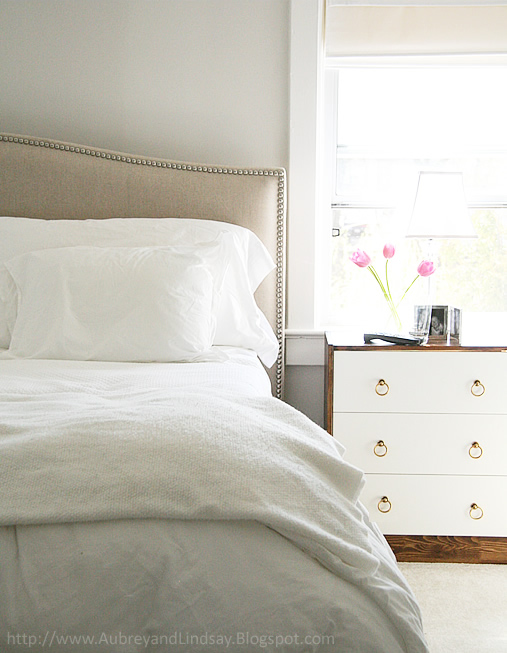
DIY | Dresser Makeover
Recently purchased a CL dresser for our bedroom. I named him Hugo.
Then decided that I actually wanted an existing dresser upstairs. Thank God for patient husbands.
So Hugo stayed in my office. And I began researching DIY projects to give him a face lift. We are going to be working together daily. Hugo needs to look good. Real good.
See below for just a few of my favorite DIY dressers.

Photo Source: For Chic Sake
Photo Source: Me and Jilly

Photo Source: Ikea Hackers
Photo Source: Little Green Notebook
Photo Source: Design Sponge
Photo Source: Martha Stewart
Photo Source: Elle Decor
Which dresser is your favorite? Got any fun weekend projects?
Then decided that I actually wanted an existing dresser upstairs. Thank God for patient husbands.
So Hugo stayed in my office. And I began researching DIY projects to give him a face lift. We are going to be working together daily. Hugo needs to look good. Real good.
See below for just a few of my favorite DIY dressers.

Photo Source: For Chic Sake
Photo Source: Me and Jilly

Photo Source: Ikea Hackers
Photo Source: Little Green Notebook
Photo Source: Design Sponge
Photo Source: Martha Stewart
Photo Source: Elle Decor
Which dresser is your favorite? Got any fun weekend projects?
Friday, August 30, 2013
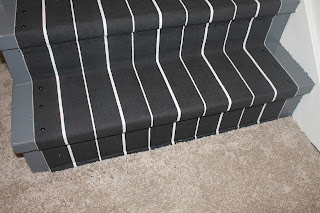
DIY | Stripey Stair Runner
You know those creepy basements? The ones that smell, and that are dark and dim? The ones that you enter and think, what will I see today: a. a mouse, b. a body, or c. a ghost?
That was our basement. Might sort of still be, but changes are happening.
When we moved in the entire floor was forest green concrete (as were some of the "accent" walls). The stairs were creeky and there was a weird eat in kitchen nook with no kitchen.
I know. It totally makes sense to me too.
It was one of the rooms on our project list that was probably going to take a back seat UNTIL... we got a sweet deal on a beautiful pool table. Which meant we just had to get carpet. Fine by me.
It also meant that I needed to start ASAP on making the space more comfortable (people were coming). Starting with the stairs (check out my blog on stair inspiration here).
I fully copied Little Green Notebook's DIY: Stair Runner project here. I love her blog. I did just a few things differently, so I'll speak to those as she is a lot more concise when talking about the step by step on how to install this budget beauty.
And you can see by my pictures that her directions were easy to follow.
Things I did a bit differently:
- I used floor paint as recommended by our paint store. It has a glossy finish and will be easier to clean. When I clean the basement...
- I matched the color to "Carbon" from the Jeff Lewis paint deck since we don't have a Dunn Edwards store in Portland (or Oregon for that matter). I guess Jeff doesn't think hippies paint. And yes, I had the deck mailed to me from California. Don't judge.
- I should have looked for black brads. Do they exist? Probably. Instead I'm going over the brads that you can see with a black sharpie. Don't tell anyone.
- I finished the end of the runner by cutting it at the floor and rolling it twice, similar to a curtain hem. I used the brad gun to nail it secure. I like the finished look.
- I love my brad gun. This was the first time I used it and one thing I will say is that the closer you press it to the runner, the less the brad sticks out. Sounds obvious, but I like to state the obvious.
- Be generous with the rug gripper. The stairs that have the larger pieces (I didn't have enough to cover each stair entirely) feel more secure.
Saturday, August 24, 2013
DIY | 14 Cork Projects
With the amount of visitors we have had this month, and the recent trip to Oregon wine country, the corks are piling up. A good sign (I think).
I also had a friend recently email me and request some ideas for cork DIYs. Here you go, Beav!
Check out some ideas below. Grab a bottle and get inspired.
Lizzie Joe Designs coasters as featured on Apartment Therapy. You can also buy these from her Etsy page if you aren't the crafty kind.
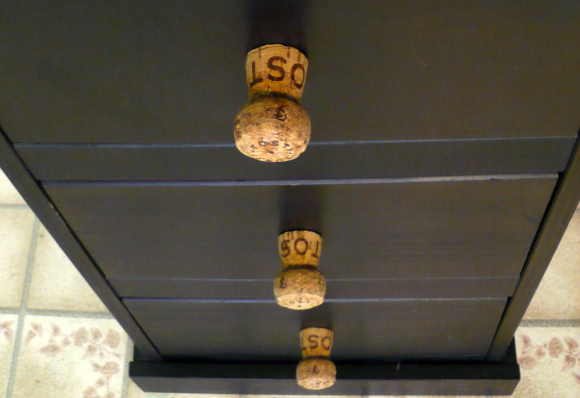
Cork drawer pulls from Dollar Store Crafts. Fun kitchen addition!
How about this cork bird house? Very cute!
Maybe this chair from Terramia?
Love taking the otherwise mundane cork board and adding a fun, inexpensive Ikea frame.
What about the DIY bathmat?
Herb Markers for those without the craft gene.
Thread spool wine stoppers. Great gift!
Maybe a mini succulent garden?
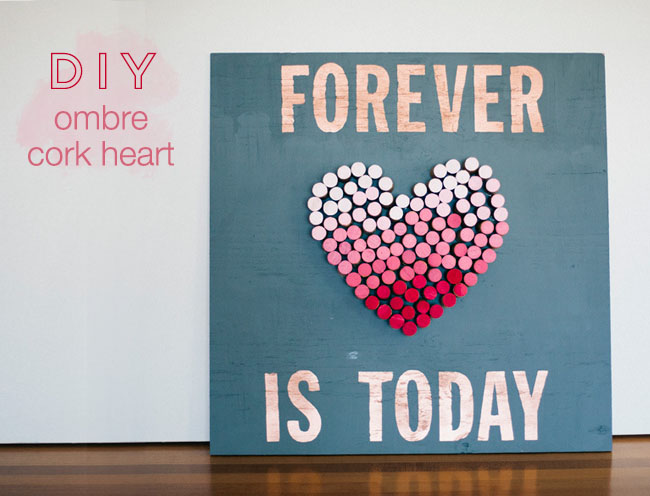
Or an Ombre heart?
Place card holders for your next soiree courtesy of Hope Studios!
Fridge magnets as inspired by Alissa Rose's Etsy shop.
A wine corkexdo? Why not?
And last, but not least, cork letters.
What's on your weekend craft schedule? Need help with that wine?
I also had a friend recently email me and request some ideas for cork DIYs. Here you go, Beav!
Check out some ideas below. Grab a bottle and get inspired.
 |
| Photo Source: Lizzie Joe Designs |
Lizzie Joe Designs coasters as featured on Apartment Therapy. You can also buy these from her Etsy page if you aren't the crafty kind.
 |
| Photo Source: Dollar Store Crafts |
Cork drawer pulls from Dollar Store Crafts. Fun kitchen addition!
 |
| Photo Source: Tinned Pineapple |
How about this cork bird house? Very cute!
 |
| Photo Source: Terramia |
Maybe this chair from Terramia?
 |
| Photo Source: Suze Geeks Out |
Love taking the otherwise mundane cork board and adding a fun, inexpensive Ikea frame.
 |
| Photo Source: Crafty Nest |
What about the DIY bathmat?
 |
| Photo Source: Shine Your Light |
Herb Markers for those without the craft gene.
| Photo Source: A Beautiful Mess |
Thread spool wine stoppers. Great gift!
 |
| Photo Source: Upcycle That |
Maybe a mini succulent garden?
 |
| Photo Source: Green Wedding Shoes |
Or an Ombre heart?
 |
| Photo Source: Hope Studios |
Place card holders for your next soiree courtesy of Hope Studios!
 |
| Photo Source: AlissaRose's Etsy Shop |
Fridge magnets as inspired by Alissa Rose's Etsy shop.
 |
| Photo Source: Wonder How To |
A wine corkexdo? Why not?
 |
| Photo Source: Growing up Gardner |
And last, but not least, cork letters.
What's on your weekend craft schedule? Need help with that wine?
Thursday, August 22, 2013
DIY | Trick to Hanging (otherwise tough) Artwork
I have to be mentally prepared to hang artwork. Like, not hungry, well rested, and in a good mood. And then this song plays in my head on repeat.
ESPECIALLY when the frame has two sets of mounted screw holes (see above). How am I supposed to mark on the wall? The answer is, I don't. I just drill about fifteen holes. Until now.
I've had this mirror/key hook since I lived in San Francisco, and every time I move I consider donating it JUST to avoid having to hang it.
Long story short (or short story long, depending on how you look at it), I developed an easy way to drill only two holes for these pesky frames. That's right! No more swiss cheese walls.
It's really technical so follow closely.
Start by grabbing blue painter's tape. Other tape would probably work, I just like painter's tape because I know it wouldn't mess up the wall. The wall that needs to be painted.
Place it along your frame/art/mirror.
Pick a hole placement. I went with the upper hole since that is where the screw will slide into.
Poke a hole on each side.
Put the tape on the wall, level it and make sure you've accounted for the height of the piece (this photo was taken post drilling, so it's not completely flat). Mark the wall where your two holes in the tape are.
Drill holes. Insert screws.
Hang.
Easy, right?
What's your least favorite thing to do in a new house?
Tuesday, August 20, 2013
DIY | Farmhouse Tabletop
We found our dining room table when we lived in Boston. It was at a local Goodwill and I think it was around $50. We sanded and painted it, and it was good to go for a couple of years.
When we moved into our new place, I wanted to refinish the top. I thought it looked a little young, and well, we're old now. Sort of. And I was over the stripes that were now chevron.
I started by disassembling the table and sanding down the top. The veneer started to peel up. It was another project gone wrong (shocker!). So, the research began.
I talked a little bit about dining room table inspiration here. I toyed with finding some metal to wrap the top with, maybe a new veneer. I opted to try and make my own top.
I measured and found Brown Lumber (thank you, Yelp!). Best decision yet. The person helping me had just made his own tabletop and spent forty-five minutes with me, looking at different types of wood, talking about how to construct it, and giving me confidence that I could actually do this on my own.
Material purchased (and cut) at Brown Lumber included:
6 - 2x6 @ 60" (tabletop planks)
2 - 2x6 @ 33" (ends)
Wood glue
All for a grand total of $27. That's a salad at Whole Foods.
A quick trip to Lowe's for clamps (I bought two because they were a little spendy, probably should have invested in four), and I was in business.
Started by arranging all of the pieces in the order I wanted to see them, hiding marks that I thought would be hard to sand down. Added a line of wood glue to the edges (obviously not the outside edges), squared them up as evenly as possible, and clamped them down.
Once they were dry, I added the two end pieces. I was told I could temporarily screw these in place (because I didn't have a clamp that would work) and remove the screw once the glue dried, however I didn't need to. They dried and were as solidly in place as the other planks.
You can see I didn't get things perfectly square. It would have helped to have a second person help square it up after the glue was applied, but that being said, I don't really mind the finished look.
Once everything was dry, I sanded minimally.
The picture above is three coats of stain. I'm going back and forth about adding a couple more layers. It will be finished with polyurethane to protect.
I also left some of the edges with raw wood exposed. I liked the charm this added.
The top isn't completely even (this is where more clamps and a second person would have come in handy!), but it's a farmhouse top, so I figure a bit of rustic-ness is appropriate.
Total Time: A weekend depending on glue and stain dry time (I worked on this over a course of a week or so - staining when I had time)
Materials:
1. Table Base
2. Wood Glue
3. Clamps large enough to clamp the width of the table
4. Stain and Brush (I used Rust-Oleum Wood Stain in Kona)
5. Hand sander and P40 sandpaper (I wanted a rougher finish)
6. Polyurethane (I am going to use Minwax Clear Satin)
7. Rags (to wipe glue and extra stain)
8. Wood (duh)
Instructions:
1. Measure necessary dimensions and go to your favorite lumber yard
2. Arrange the wood as you would like it to be assembled
3. Add a line of glue to all edges that will be butted together, square everything as much as possible and let dry (use a wet rag to wipe up any excess glue)
4. Add the end wood pieces with glue, square and let dry
5. Sand as necessary
6. Stain
7. Add polyurethane
8. Attach to table base
The room needs to be painted and styled properly, but I wanted to show how it fits.

We are going to add these chairs (shameless plug: they are available to Urban Perch eDesign clients and will soon be added to our site). I'm also considering upholstering the Ikea bench.
Stay tuned as I style the space! Hopefully in time for Thanksgiving...
Check out Ana White's blog for more detailed instructions on how to construct your own farmhouse table base and top!
When we moved into our new place, I wanted to refinish the top. I thought it looked a little young, and well, we're old now. Sort of. And I was over the stripes that were now chevron.
I started by disassembling the table and sanding down the top. The veneer started to peel up. It was another project gone wrong (shocker!). So, the research began.
I talked a little bit about dining room table inspiration here. I toyed with finding some metal to wrap the top with, maybe a new veneer. I opted to try and make my own top.
 |
| Tea for my husband, lumber for me |
I measured and found Brown Lumber (thank you, Yelp!). Best decision yet. The person helping me had just made his own tabletop and spent forty-five minutes with me, looking at different types of wood, talking about how to construct it, and giving me confidence that I could actually do this on my own.
Material purchased (and cut) at Brown Lumber included:
6 - 2x6 @ 60" (tabletop planks)
2 - 2x6 @ 33" (ends)
Wood glue
All for a grand total of $27. That's a salad at Whole Foods.
A quick trip to Lowe's for clamps (I bought two because they were a little spendy, probably should have invested in four), and I was in business.
Started by arranging all of the pieces in the order I wanted to see them, hiding marks that I thought would be hard to sand down. Added a line of wood glue to the edges (obviously not the outside edges), squared them up as evenly as possible, and clamped them down.
 |
| The old tabletop is on the ground - what a mess! |
Once they were dry, I added the two end pieces. I was told I could temporarily screw these in place (because I didn't have a clamp that would work) and remove the screw once the glue dried, however I didn't need to. They dried and were as solidly in place as the other planks.
You can see I didn't get things perfectly square. It would have helped to have a second person help square it up after the glue was applied, but that being said, I don't really mind the finished look.
Once everything was dry, I sanded minimally.
The picture above is three coats of stain. I'm going back and forth about adding a couple more layers. It will be finished with polyurethane to protect.
I also left some of the edges with raw wood exposed. I liked the charm this added.
The top isn't completely even (this is where more clamps and a second person would have come in handy!), but it's a farmhouse top, so I figure a bit of rustic-ness is appropriate.
Total Time: A weekend depending on glue and stain dry time (I worked on this over a course of a week or so - staining when I had time)
Materials:
1. Table Base
2. Wood Glue
3. Clamps large enough to clamp the width of the table
4. Stain and Brush (I used Rust-Oleum Wood Stain in Kona)
5. Hand sander and P40 sandpaper (I wanted a rougher finish)
6. Polyurethane (I am going to use Minwax Clear Satin)
7. Rags (to wipe glue and extra stain)
8. Wood (duh)
Instructions:
1. Measure necessary dimensions and go to your favorite lumber yard
2. Arrange the wood as you would like it to be assembled
3. Add a line of glue to all edges that will be butted together, square everything as much as possible and let dry (use a wet rag to wipe up any excess glue)
4. Add the end wood pieces with glue, square and let dry
5. Sand as necessary
6. Stain
7. Add polyurethane
8. Attach to table base
The room needs to be painted and styled properly, but I wanted to show how it fits.

We are going to add these chairs (shameless plug: they are available to Urban Perch eDesign clients and will soon be added to our site). I'm also considering upholstering the Ikea bench.
Stay tuned as I style the space! Hopefully in time for Thanksgiving...
Check out Ana White's blog for more detailed instructions on how to construct your own farmhouse table base and top!
Subscribe to:
Posts (Atom)


