Friday, August 30, 2013

DIY | Stripey Stair Runner

You know those creepy basements?  The ones that smell, and that are dark and dim?  The ones that you enter and think, what will I see today: a. a mouse, b. a body, or c. a ghost?

That was our basement.  Might sort of still be, but changes are happening.


When we moved in the entire floor was forest green concrete (as were some of the "accent" walls).  The stairs were creeky and there was a weird eat in kitchen nook with no kitchen.

I know.  It totally makes sense to me too.

It was one of the rooms on our project list that was probably going to take a back seat UNTIL... we got a sweet deal on a beautiful pool table.  Which meant we just had to get carpet.  Fine by me.

It also meant that I needed to start ASAP on making the space more comfortable (people were coming).  Starting with the stairs (check out my blog on stair inspiration here).

I fully copied Little Green Notebook's DIY: Stair Runner project here.  I love her blog.  I did just a few things differently, so I'll speak to those as she is a lot more concise when talking about the step by step on how to install this budget beauty.


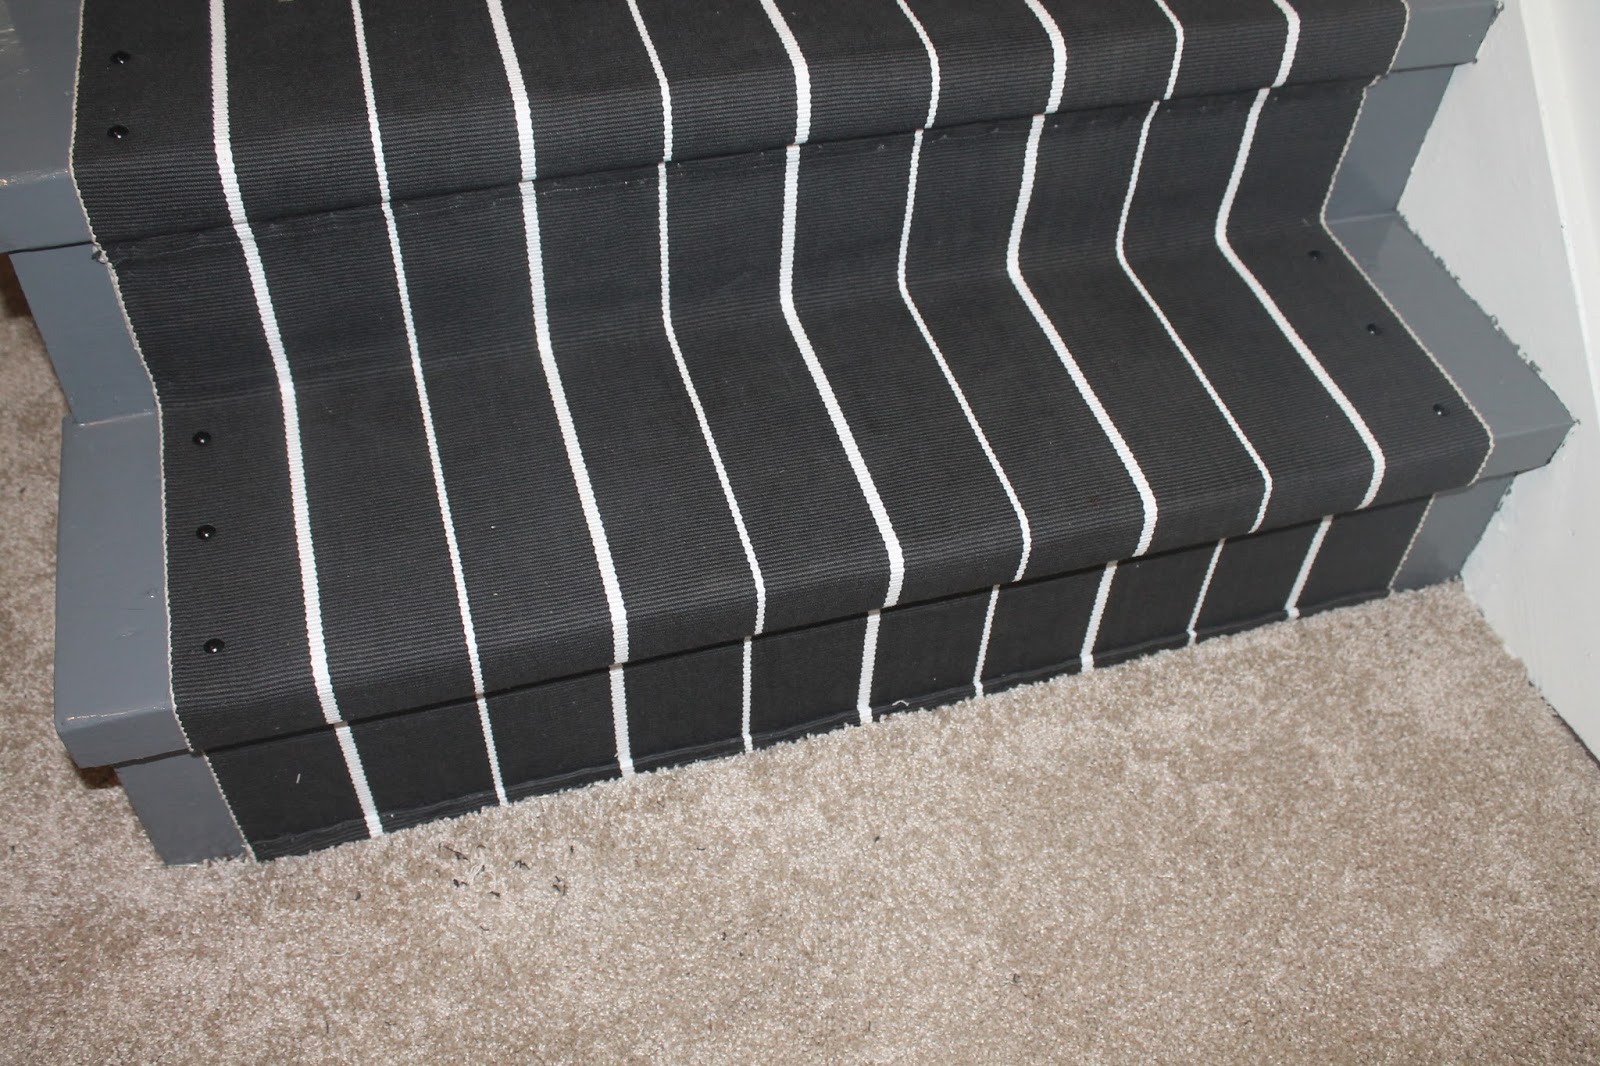
And you can see by my pictures that her directions were easy to follow.

Things I did a bit differently:


  • I used floor paint as recommended by our paint store.  It has a glossy finish and will be easier to clean.  When I clean the basement...
  • I matched the color to "Carbon" from the Jeff Lewis paint deck since we don't have a Dunn Edwards store in Portland (or Oregon for that matter).  I guess Jeff doesn't think hippies paint.  And yes, I had the deck mailed to me from California.  Don't judge. 


  • I should have looked for black brads.  Do they exist?  Probably.  Instead I'm going over the brads that you can see with a black sharpie.  Don't tell anyone.


  • I finished the end of the runner by cutting it at the floor and rolling it twice, similar to a curtain hem.  I used the brad gun to nail it secure.  I like the finished look.
  • I love my brad gun.  This was the first time I used it and one thing I will say is that the closer you press it to the runner, the less the brad sticks out.  Sounds obvious, but I like to state the obvious.
  • Be generous with the rug gripper.  The stairs that have the larger pieces (I didn't have enough to cover each stair entirely) feel more secure.
What projects are you working on this weekend?  Happy Friday!

Monday, August 26, 2013

Saturday, August 24, 2013

DIY | 14 Cork Projects

With the amount of visitors we have had this month, and the recent trip to Oregon wine country, the corks are piling up.  A good sign (I think).

I also had a friend recently email me and request some ideas for cork DIYs.  Here you go, Beav!

Check out some ideas below.  Grab a bottle and get inspired.

Photo Source: Lizzie Joe Designs


Lizzie Joe Designs coasters as featured on Apartment Therapy.  You can also buy these from her Etsy page if you aren't the crafty kind.

Photo Source: Dollar Store Crafts


Cork drawer pulls from Dollar Store Crafts.  Fun kitchen addition!

Photo Source: Tinned Pineapple


How about this cork bird house?  Very cute!

Photo Source: Terramia


Maybe this chair from Terramia?

Photo Source: Suze Geeks Out


Love taking the otherwise mundane cork board and adding a fun, inexpensive Ikea frame.

Photo Source: Crafty Nest


What about the DIY bathmat?

Photo Source: Shine Your Light


Herb Markers for those without the craft gene.

Photo Source: A Beautiful Mess


Thread spool wine stoppers.  Great gift!

Photo Source: Upcycle That


Maybe a mini succulent garden?

Photo Source: Green Wedding Shoes


Or an Ombre heart?

Photo Source: Hope Studios


Place card holders for your next soiree courtesy of Hope Studios!

Photo Source: AlissaRose's Etsy Shop


Fridge magnets as inspired by Alissa Rose's Etsy shop.

Photo Source: Wonder How To


A wine corkexdo?  Why not?

Photo Source: Growing up Gardner


And last, but not least, cork letters

What's on your weekend craft schedule?  Need help with that wine?

Thursday, August 22, 2013

DIY | Trick to Hanging (otherwise tough) Artwork

I have to be mentally prepared to hang artwork.  Like, not hungry, well rested, and in a good mood.  And then this song plays in my head on repeat.


ESPECIALLY when the frame has two sets of mounted screw holes (see above).  How am I supposed to mark on the wall?  The answer is, I don't.  I just drill about fifteen holes.  Until now.

I've had this mirror/key hook since I lived in San Francisco, and every time I move I consider donating it JUST to avoid having to hang it.

Long story short (or short story long, depending on how you look at it), I developed an easy way to drill only two holes for these pesky frames.  That's right!  No more swiss cheese walls.

It's really technical so follow closely.

Start by grabbing blue painter's tape.  Other tape would probably work, I just like painter's tape because I know it wouldn't mess up the wall.  The wall that needs to be painted.


Place it along your frame/art/mirror.


Pick a hole placement.  I went with the upper hole since that is where the screw will slide into.


Poke a hole on each side.


Put the tape on the wall, level it and make sure you've accounted for the height of the piece (this photo was taken post drilling, so it's not completely flat).  Mark the wall where your two holes in the tape are.


Drill holes.  Insert screws.


Hang.

Easy, right?

What's your least favorite thing to do in a new house?

Contact

Name

Email *

Message *