Saturday, August 24, 2013

DIY | 14 Cork Projects

With the amount of visitors we have had this month, and the recent trip to Oregon wine country, the corks are piling up.  A good sign (I think).

I also had a friend recently email me and request some ideas for cork DIYs.  Here you go, Beav!

Check out some ideas below.  Grab a bottle and get inspired.

Photo Source: Lizzie Joe Designs


Lizzie Joe Designs coasters as featured on Apartment Therapy.  You can also buy these from her Etsy page if you aren't the crafty kind.

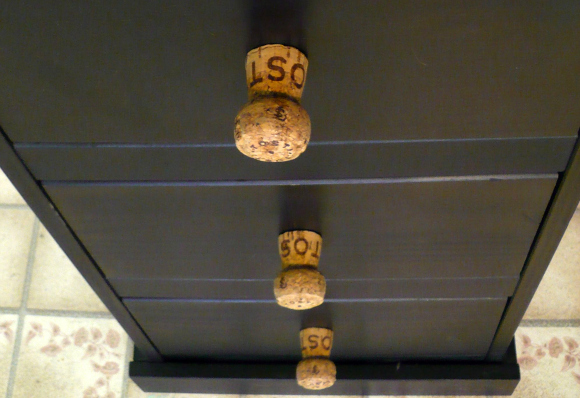
Photo Source: Dollar Store Crafts


Cork drawer pulls from Dollar Store Crafts.  Fun kitchen addition!

Photo Source: Tinned Pineapple


How about this cork bird house?  Very cute!

Photo Source: Terramia


Maybe this chair from Terramia?

Photo Source: Suze Geeks Out


Love taking the otherwise mundane cork board and adding a fun, inexpensive Ikea frame.

Photo Source: Crafty Nest


What about the DIY bathmat?

Photo Source: Shine Your Light


Herb Markers for those without the craft gene.

Photo Source: A Beautiful Mess


Thread spool wine stoppers.  Great gift!

Photo Source: Upcycle That


Maybe a mini succulent garden?

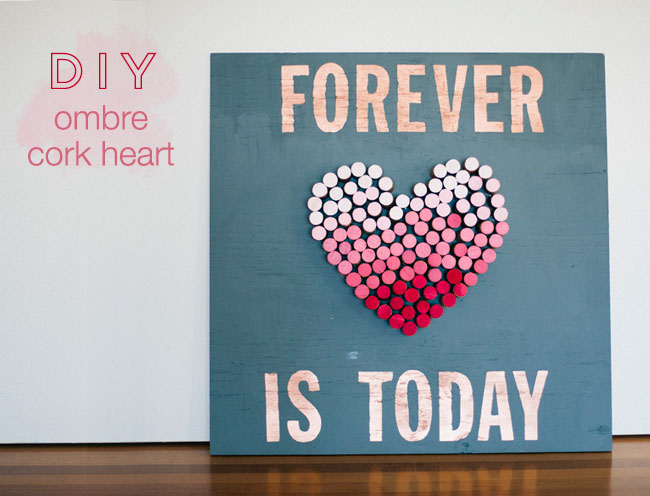
Photo Source: Green Wedding Shoes


Or an Ombre heart?

Photo Source: Hope Studios


Place card holders for your next soiree courtesy of Hope Studios!

Photo Source: AlissaRose's Etsy Shop


Fridge magnets as inspired by Alissa Rose's Etsy shop.

Photo Source: Wonder How To


A wine corkexdo?  Why not?

Photo Source: Growing up Gardner


And last, but not least, cork letters. 

What's on your weekend craft schedule?  Need help with that wine?

Thursday, August 22, 2013

DIY | Trick to Hanging (otherwise tough) Artwork

I have to be mentally prepared to hang artwork.  Like, not hungry, well rested, and in a good mood.  And then this song plays in my head on repeat.


ESPECIALLY when the frame has two sets of mounted screw holes (see above).  How am I supposed to mark on the wall?  The answer is, I don't.  I just drill about fifteen holes.  Until now.

I've had this mirror/key hook since I lived in San Francisco, and every time I move I consider donating it JUST to avoid having to hang it.

Long story short (or short story long, depending on how you look at it), I developed an easy way to drill only two holes for these pesky frames.  That's right!  No more swiss cheese walls.

It's really technical so follow closely.

Start by grabbing blue painter's tape.  Other tape would probably work, I just like painter's tape because I know it wouldn't mess up the wall.  The wall that needs to be painted.


Place it along your frame/art/mirror.


Pick a hole placement.  I went with the upper hole since that is where the screw will slide into.


Poke a hole on each side.


Put the tape on the wall, level it and make sure you've accounted for the height of the piece (this photo was taken post drilling, so it's not completely flat).  Mark the wall where your two holes in the tape are.


Drill holes.  Insert screws.


Hang.

Easy, right?

What's your least favorite thing to do in a new house?

Tuesday, August 20, 2013

DIY | Farmhouse Tabletop

We found our dining room table when we lived in Boston.  It was at a local Goodwill and I think it was around $50.  We sanded and painted it, and it was good to go for a couple of years.


When we moved into our new place, I wanted to refinish the top.  I thought it looked a little young, and well, we're old now.  Sort of.  And I was over the stripes that were now chevron.

I started by disassembling the table and sanding down the top.  The veneer started to peel up.  It was another project gone wrong (shocker!).  So, the research began.

I talked a little bit about dining room table inspiration here.  I toyed with finding some metal to wrap the top with, maybe a new veneer.  I opted to try and make my own top.

Tea for my husband, lumber for me


I measured and found Brown Lumber (thank you, Yelp!).  Best decision yet.  The person helping me had just made his own tabletop and spent forty-five minutes with me, looking at different types of wood, talking about how to construct it, and giving me confidence that I could actually do this on my own.

Material purchased (and cut) at Brown Lumber included:
6 - 2x6 @ 60" (tabletop planks)
2 - 2x6 @ 33" (ends)
Wood glue

All for a grand total of $27.  That's a salad at Whole Foods.


A quick trip to Lowe's for clamps (I bought two because they were a little spendy, probably should have invested in four), and I was in business.

Started by arranging all of the pieces in the order I wanted to see them, hiding marks that I thought would be hard to sand down.  Added a line of wood glue to the edges (obviously not the outside edges), squared them up as evenly as possible, and clamped them down.

The old tabletop is on the ground - what a mess!


Once they were dry, I added the two end pieces.  I was told I could temporarily screw these in place (because I didn't have a clamp that would work) and remove the screw once the glue dried, however I didn't need to.  They dried and were as solidly in place as the other planks.

You can see I didn't get things perfectly square.  It would have helped to have a second person help square it up after the glue was applied, but that being said, I don't really mind the finished look.

Once everything was dry, I sanded minimally.


The picture above is three coats of stain.  I'm going back and forth about adding a couple more layers.  It will be finished with polyurethane to protect.

I also left some of the edges with raw wood exposed.  I liked the charm this added.


The top isn't completely even (this is where more clamps and a second person would have come in handy!), but it's a farmhouse top, so I figure a bit of rustic-ness is appropriate.

Total Time: A weekend depending on glue and stain dry time (I worked on this over a course of a week or so - staining when I had time)
Materials:
1.  Table Base
2.  Wood Glue
3.  Clamps large enough to clamp the width of the table
4.  Stain and Brush (I used Rust-Oleum Wood Stain in Kona)
5.  Hand sander and P40 sandpaper (I wanted a rougher finish)
6.  Polyurethane (I am going to use Minwax Clear Satin)
7.  Rags (to wipe glue and extra stain)
8.  Wood (duh)

Instructions:
1.  Measure necessary dimensions and go to your favorite lumber yard
2.  Arrange the wood as you would like it to be assembled
3.  Add a line of glue to all edges that will be butted together, square everything as much as possible and let dry (use a wet rag to wipe up any excess glue)
4.   Add the end wood pieces with glue, square and let dry
5.  Sand as necessary
6.  Stain
7.  Add polyurethane
8.  Attach to table base


The room needs to be painted and styled properly, but I wanted to show how it fits.


We are going to add these chairs (shameless plug: they are available to Urban Perch eDesign clients and will soon be added to our site).  I'm also considering upholstering the Ikea bench.

Stay tuned as I style the space!  Hopefully in time for Thanksgiving...

Check out Ana White's blog for more detailed instructions on how to construct your own farmhouse table base and top!

Monday, August 19, 2013

Concept | Dining Room Tables

Lets talk dining room tables.  I need a new tabletop.  I started to sand my existing one down to refinish it, and the veneer started to peel up.  What to do now?

The base is in good shape, so I started to look for inspiration.

Check, check, check it out.

Photo Source: Anthropologie


Galvanized Pedestal table from Anthropologie is gorgeous.  The galvanized zinc top makes this a statement piece.

Photo Source: Noir Furniture


We just opened an account with Noir Furniture for our private clients and I love, love, love their Ferret Dining Table.  Chunky legs never looked so good.

Photo Source: Rocky Mountain Table Co. on Etsy


I've been following Rocky Mountain Table Co. on Instagram for a few months now, and their work never ceases to amaze me.  This handmade Farmhouse table on Etsy is just one example.

Photo Source: Ana-White.com


In the mood for a DIY?  Check out Ana White's site for information on how to make your very own Farmhouse Table.

Photo Source: the Hunted Interior


And another incredible DIY by the Hunted Interior.  This one is a Live Edge Table. 

What dining room table are you currently coveting?

Stay tuned for my table DIY!

Thursday, August 15, 2013

Throwback Thursday | My Vintage Fix

Sometimes when I'm having a rough day I like to head to the nearest vintage store and browse (okay, okay, and a lot of times buy).  It is almost like meditation for me.  I get lost and creative, and good things happen. 

Here's a list of a few more favorites (you may remember the North Portland vintage shops I toured here).  The list below is a bit more spread out, but worth the trek.

Red Fox Vintage
3014 NE Killingsworth
On the smaller side, but this store packs a punch with quality clothes and furnishings.  I recently purchased two antique Indian cabinet pulls (these suckers are big, like 8" diameter) and a campaign dresser (one of my favorite purchases...ever).

Photo courtesy of Yelp


Rerun
707 NE Fremont St
We've sold some stuff here when we were purging after our move.  They have great furniture finds, especially when the weather is nice and they are able to store pieces outside.  Some of my favorite finds include a vintage tea set and mid-century metal chairs that I reupholstered.   Things are priced to move!

Photo courtesy of Yelp


Hippo Hardware
1040 E Burnside St
Welcome, imagination.  I've missed you.  This place has multiple stories of antique cabinet hardware, door pulls, bathroom and light fixtures.  Salvage store on steroids!  And the hippos around the exterior are pretty cute too!

Photo courtesy of Yelp


Monticello Antiques
8600 SE Stark St
Large store with booths from different vendors.  You could literally spend hours in here (and I have).  Costume jewelry, artwork, furniture, signage...fun just to browse!  Some items can seem a bit over priced, but all in all, there are good deals to be had.  The cafe's cookies are pretty tasty too.

Photo courtesy of Yelp


Where are your favorite vintage shops?  Spill!

Tuesday, August 13, 2013

eDesign | Henry's Big Boy Room

Urban Perch's most recent e-design is for Brenna's 2-1/2 year old son, Henry (who should start a career in toddler modeling immediately).  Henry was in need of a big boy room as he and his family prepare for the arrival of his baby sister.

Brenna had picked out Henry's Busy Builder sheeting from Pottery Barn and his Little Treasures Mates bed from Target.  She also had an existing red bookshelf (that I love).

The rest of the design was free reign, and I wanted to make sure we tapped into Henry's creative spirit and saw the building "theme" throughout.  As usual, I wanted this to be a room he could grow into so I found some graphic art prints that could be used on a gallery wall and were appropriate for babies and big boys alike!

Henry's new space plan is below, and you can find his Urban Perch designed Pinterest board here.


A few project details:
Avoid: Pink
Likes: Navy, White and Red
Style: Traditional, Vintage
Space Issues: Storage and a place to play
Existing furniture: Bed, Bookshelf, Carpet


Everything in this room is graphic and fun, and better yet, affordable (insert virtual Frederik high kick)!

My favorite pieces are the three-dimensional tool pillows from Etsy, the nightstand options from both Land of Nod and Urban Outfitters, and the nightstand lamp options from Target and Urban Outfitters.

I also love the idea of transforming an affordable dresser with more expensive hardware. 

What are your favorite details?

Interested in becoming an e-design client?  Reach out!

Monday, August 12, 2013

DIY | Picnic Table Refresh


We finally got around to refinishing the picnic table the old home owners left for us.  Check out the "before" picture above.  It had good bones!


This is going to be short and sweet.  Mainly because the Olympic Maximum Stain and Sealant we got from Lowe's worked like a charm.  It's meant for outdoor use and you can still see a bit of the wood grain.


Total Time: 2 hours (this includes the time it took for our table to dry in the sun)
Materials:
1.  Old picnic table (or unfinished picnic table)
2.  1 quart of Olympic Maximum Stain and Sealant (we asked for a quart and the woman at Lowe's accidentally mixed a gallon)
3.  Drop cloth
4.  Paint Rollers
5.  Paint Roller Tray
6.  Hand sander and P40 sandpaper
Instructions:
1.  Wash table and let dry
2.  Sand as needed
3.  Wipe table clean of dust
4.  Put table on drop cloth and paint!

We used one coat on the majority of the table.  Two coats on the table top and seat tops!  And the patio is holding up!


The color we used was Copper Henna, which just happens to match an Ikat outdoor fabric I'm using to recover a few chairs.

Looks so much better, don't you think?

What's on your project list this weekend?  And yes, I'm already talking about this weekend!

Contact

Name

Email *

Message *