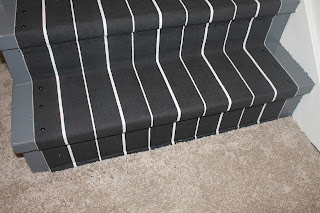
That was our basement. Might sort of still be, but changes are happening.
When we moved in the entire floor was forest green concrete (as were some of the "accent" walls). The stairs were creeky and there was a weird eat in kitchen nook with no kitchen.
I know. It totally makes sense to me too.
It was one of the rooms on our project list that was probably going to take a back seat UNTIL... we got a sweet deal on a beautiful pool table. Which meant we just had to get carpet. Fine by me.
It also meant that I needed to start ASAP on making the space more comfortable (people were coming). Starting with the stairs (check out my blog on stair inspiration here).
I fully copied Little Green Notebook's DIY: Stair Runner project here. I love her blog. I did just a few things differently, so I'll speak to those as she is a lot more concise when talking about the step by step on how to install this budget beauty.
And you can see by my pictures that her directions were easy to follow.
Things I did a bit differently:
- I used floor paint as recommended by our paint store. It has a glossy finish and will be easier to clean. When I clean the basement...
- I matched the color to "Carbon" from the Jeff Lewis paint deck since we don't have a Dunn Edwards store in Portland (or Oregon for that matter). I guess Jeff doesn't think hippies paint. And yes, I had the deck mailed to me from California. Don't judge.
- I should have looked for black brads. Do they exist? Probably. Instead I'm going over the brads that you can see with a black sharpie. Don't tell anyone.
- I finished the end of the runner by cutting it at the floor and rolling it twice, similar to a curtain hem. I used the brad gun to nail it secure. I like the finished look.
- I love my brad gun. This was the first time I used it and one thing I will say is that the closer you press it to the runner, the less the brad sticks out. Sounds obvious, but I like to state the obvious.
- Be generous with the rug gripper. The stairs that have the larger pieces (I didn't have enough to cover each stair entirely) feel more secure.


No comments:
Post a Comment